Who’s ready to rock out and become the coolest guitar hero? That’s right, get ready for your kids to strum their way to stardom with a homemade cardboard toy guitar!
Don’t worry, you won’t need any fancy guitar lessons or expensive equipment for this one – just your imagination and a touch of creativity.
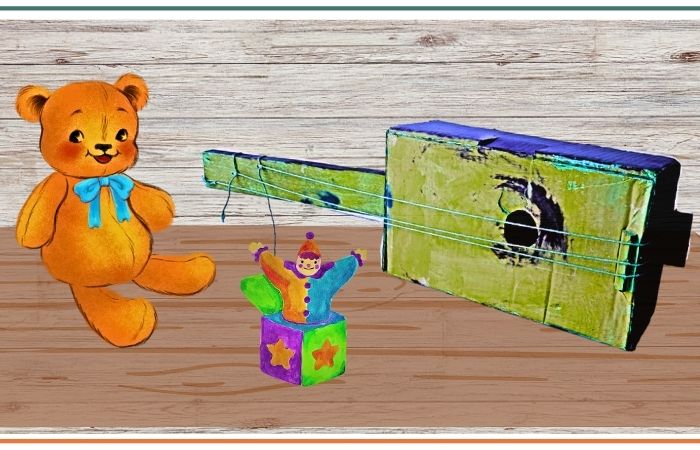
My own mini rockstars saw a pile of leftover cardboard boxes and wanted to transform them them into something extraordinary. With their fingers itching to strum some strings, we embarked on a mission to craft the ultimate toy guitar.

Directions For Cardboard Toy Guitar
In this blog post, we’ll guide you through the step-by-step process of making a cardboard toy guitar with your child. So, grab your cardboard, glue, and paints – let’s dive into this fun and educational adventure together and make some magical music with your child.
What You Will Need
- A sturdy cardboard box (big enough to create the guitar body)
- Thick cardboard or poster board (for the guitar neck)
- Scissors
- Craft knife (with adult supervision)
- Colorful duct tape or decorative paper
- Rubber bands (at least 4)
- Hot glue or strong adhesive
- Paint, markers, or stickers (optional for decoration)
Step 1: Prepare The Guitar Body
First things first, let’s find a sturdy cardboard box that will serve as the body of our awesome cardboard toy guitar. Choose a box that’s big enough to resemble a guitar but not too big for you to handle comfortably. A shoebox or a rectangular shipping box would work great!
Using your scissors, carefully cut off one of the longer sides of the box. This will be the front of your guitar. Feel free to round the edges or shape it to give your guitar a more authentic look. You can even cut out soundholes or design patterns on the front if you like!
Step 2: Design The Guitar Neck
Now, let’s create the neck of our cardboard toy guitar. Take your thick cardboard or poster board and cut out a strip that’s about 2-3 inches wide and long enough to extend beyond the top of the box (where the strings will be).
Attach the neck to the top of the box using hot glue or strong adhesive. Make sure it’s centered and secure. You can even tilt the neck slightly back for a more stylish look. Trim the excess length if needed.
Step 3: Add The Frets And Strings
To make our cardboard toy guitar look like the real deal, let’s add some frets and strings to the neck.
Carefully cut out small strips of duct tape or decorative paper and attach them horizontally along the neck to create the frets. You can space them evenly or mimic the fret positions on a real guitar.
Next, we’ll attach the guitar strings. Take your rubber bands and stretch them across the body of the guitar, from the bottom of the neck to the bottom of the front of the box. Make sure they are tightly stretched and evenly spaced. You can experiment with using different thicknesses of rubber bands to create different sounds!
Step 4: Decorate The Masterpiece
Now that our cardboard guitar is taking shape, let’s make it look even more incredible with some decorations! Use paint, markers, stickers, or any other creative materials you have to personalize your guitar. Add funky designs, your favorite band’s logo, or even your own signature. This is your chance to let your imagination run wild and make it uniquely yours!
Step 5: Get Ready To Rock!
Congratulations, budding rockstars! Your homemade cardboard toy guitar is complete and ready for its stage debut. Time to tune those strings, grab your pretend microphone, and unleash your musical talents!
Tips For Your Toy Guitar
Creating your own cardboard toy guitar is a fantastic way to let your creativity shine and ignite your passion for music. With just a few simple materials and a whole lot of imagination, your kids can rock out and perform like superstars.
- Hold your guitar by the neck and strum the rubber bands to produce different sounds.
- Experiment with different techniques like picking, strumming, or even sliding your fingers along the strings. Let your imagination guide your rockstar performance.
- You can even host a mini-concert for your family, friends, or stuffed animal audience. Reenact your favorite songs or create your own rock masterpiece.
Too Busy To Make A Cardboard Toy Guitar …
Try Battat Toy Guitar For Toddlers

Battat Toy Guitar for Toddlers – This delightful instrument is perfect for your little one’s musical journey. With both acoustic and electric modes, your toddler can strum away to his heart’s content. Not only is it fun, but it also offers developmental benefits. Playing the guitar helps enhance fine motor skills as he plucks the strings and press the buttons. It also promotes creativity and imagination as he creates his own songs.


