
Don’t you hate it when your kid’s earphone cable gets tangled and falls all over the place? … Then look no more! This adorable Piggy Earphone Cable Tie will help your little one to tie up her loose ends and stay out of trouble.
Every day I used to step on my daughter’s loose earphones … well almost every day. No matter how hard she tried to keep it in her purse, the wires keep popping out and spilling on the floor. And it drove me nuts!
To solve this problem, I came up with this awesome earphone cable tie, and TA-DAH – no more mess. And it’s so simple and easy to make, even teens would love it!
Fun Piggy Earphone Cable Tie To Make At Home
The Piggy Earphone Cable Tie is designed to help your daughter keep her earphone wires organized. She’ll never have tangled or twisted wires again.
This simple activity can be completed in less than 30 minutes, and all you need are some basic supplies that you may already have.
So, if she is a music lover or just knows someone who likes to keep their life organized, this is the perfect solution!
What You Will Need
- 5 pieces of craft felt (pink, fuchsia pink, black, white and light blue)
- a piece of pattern paper
- pencil
- sewing needle
- velcro
- scissors
- hot glue
- crochet thread
Directions For Piggy Earphone Cable Tie
Step 1: Gather the materials needed

Step 2: Draw a small silhouette of a pig head with ears

Step 3: Cut the pig pattern

Step 4: Use the pig pattern to cut the pink craft felt

Cut two identical shapes for this.
Step 5: Cut a small strip of light blue craft felt

The dimensions should be 5 to 7 centimeters long and 2 centimeters thick.
Step 6: Align the ears

Align the pink pig heads you cut in step 4 and sew them together using blanket stitch.
Step 7: Align the blue strip and sew

Align the blue strip below the pig head and continue blanket stitching the whole tie.
Step 8: Add the ears

Cut a pair of small ears from the fuchsia pink craft felt and glue this on the ear part of the pink pig head.
Step 9: Cut a small oblong from the fuchsia pink felt

This will be the snout of the pig. Cut a pair of small circles that will serve as the nose hole of the pig.
Step 10: Add the nose

Hot glue the nose hole to the pig’s nose and hot glue the snout on the face of the pig. This should be situated in the middle of the face.
Step 11: Make a pair of eyes

Cut a small oblong piece from the white felt. Cut a smaller circle from the light blue felt and cut an even smaller circle from the black felt. This should be done in pairs. The white is the eye, the blue is the eyeball and the black is the pupil of the eyes.
Step 12: Cut a small piece of velcro

Step 13: Attach the velcro

Hot glue the velcro to the back of the pig’s head and on the opposite end of the light blue strip.
Step 14: Test the earphone cable tie

Make any necessary adjustments based on your own personal preference.
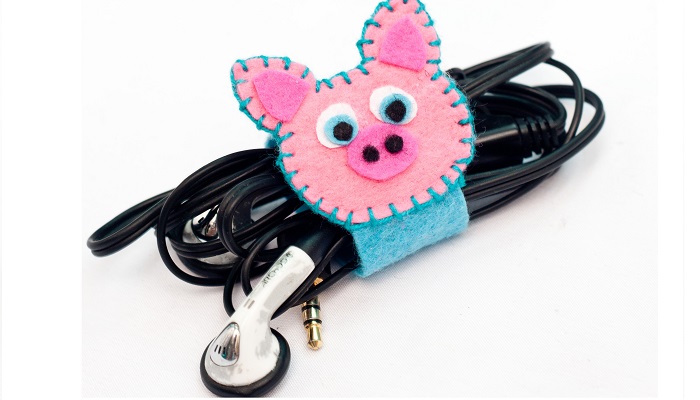
Step 15: Finally done!

You now have your own cute piggy earphone cable tie ready for use!
The earphone cable tie can be adjusted based on how long the earphone or headphone wire is. You can also stick a longer velcro if you wish to give more adhesive power to the tie. You don’t have to buy plain boring cable ties now All you have to do is create one for yourself or for your friends. Hope you like it!
RELATED TOPIC
Smart Arts And Crafts For Kids: A Parent’s Guide To Creative Fun


