
Pencil organizers are a must for kids, especially when it comes to school or desks. And your kids can make a DIY Pencil And Marker Organizer to keep their rooms tidy.
Desk organizers are cool and smart. It is a simple place for your kids to put their pencils. And what can be better than a pencil and marker organizer that your kids created with their own two hands?
They make your life easier by keeping your pencils and markers in one place and reduce the chances of them being misplaced. They also make your desk neat and presentable.
Pencil And Marker Organizer To Make At Home
We will be upcycling toilet paper rolls in this project, so this organizer will not cost a lot. You just need a little creativity to transform this into a cool pencil and marker organizer. Let’s start!
It’s basically like making art, except instead of hanging it on your wall, you keep it on your desk.
And the best part is that this project uses toilet paper rolls, so it won’t cost much to make. Your kids just need a little creativity to transform these rolls into a cool storage space for our pens and pencils.
Let’s start!
What You Will Need
- 3 pcs. Toilet paper rolls
- 3 different types or colors of 1 cm. thick ribbons
- 3 different colors of construction papers (any paper with designs would do)
- Cardboard or cereal box
- Hot glue
- Scissors
I have included recommended supplies to help your crafting experience. Some of the links below are affiliate links. This means that, at zero cost to you, I will earn an affiliate commission if you click through the link to complete your supply list.
Directions For Pencil And Marker Organizer
Step 1: Gather the material

Step 2: Cut the toilet paper rolls

Get the three toilet paper rolls and cut the two rolls in different heights in reference to the original, uncut one. This will create a leveling for each of the rolls.
Step 3: Wrap the toilet paper with construction paper

Roll a piece of construction paper around one of the toilet paper rolls. Use enough construction paper to fit around the roll.
Step 4: Glue the paper to toilet paper roll

Hot glue the end of the paper on the toilet paper roll.
Step 5: Trim the sides

Cut the excess paper on all sides of it.
Step 6: Trim the other two rolls

Do the same for the remaining two toilet rolls.
Step 7: Glue the ribbon to toilet paper roll

Get your ribbon and glue this around one end of the toilet paper roll.
Step 8: Cut the excess ribbon

Do the same for the two remaining rolls.
Step 9: Hot glue all three rolls together

Make sure that they are aligned at the bottom, so that they will stand perfectly alone.
Step 10: Glue rolls to cardboard

Get the cardboard and glue this on the bottom part of the three rolls.
Step 11: Trim around the rolls

Cut the cardboard in reference to the bottom form of the three rolls. Make a small allowance of at least 1 centimeter.
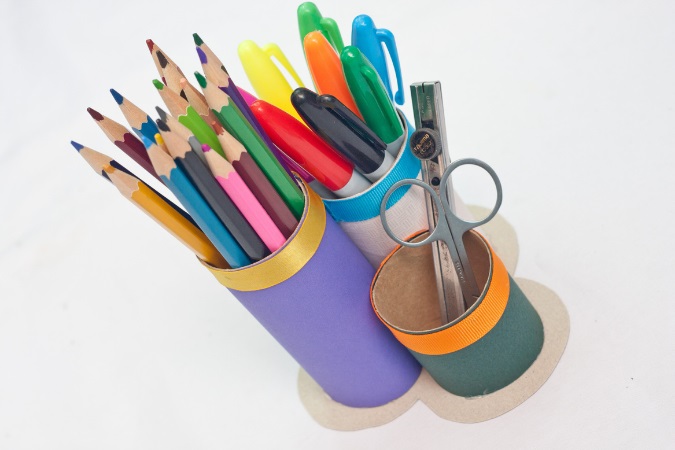
Step 12: Put your pencils and markers and you’re done!

You can make several compartments for this if you want more. You can also paint and put more designs on it to make it more personalized. Just make sure to generously glue each part to make it more durable. You can now use your pencil and marker organizer. This is an adorable organizer in your desk done in less than an hour! Hope you liked it!
RELATED TOPIC
Smart Arts And Crafts For Kids: A Parent’s Guide To Creative Fun


