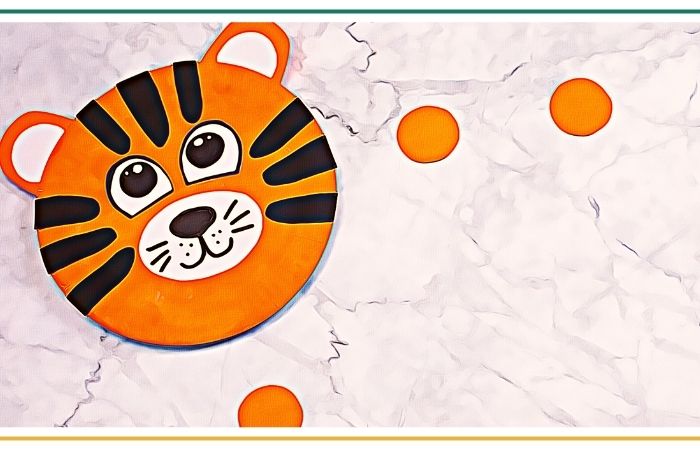
Attention all ferociously creative kids out there. Get ready to unleash your inner tiger and create an adorable paper plate tiger that’s sure to bring smiles to all who see it.
My little wildcats and I recently found ourselves with a stack of paper plates and a desire to make something roar-some. We put on our crafting hats and brainstormed ideas until we had created the most perfect paper plate tiger. With its majestic stripes and toothy grin, it quickly became our favorite crafting creation.

Directions For Feisty Paper Plate Tiger

In this blog post, I’m going to share our paper plate tiger secrets with you. Together we’ll walk through the step-by-step process of transforming a simple paper plate into a fierce and friendly tiger. So, let’s pounce into this crafting adventure and have some roar-some fun!
What You Will Need:
Before we embark on our craft adventure, collect the following materials needed to make our paper plate tiger:
- Paper plate (preferably a sturdy one)
- Orange and black paint (acrylic or tempera)
- Paintbrushes (one for each color)
- Googly eyes (medium-sized)
- Black and white construction paper
- Scissors
- Craft glue
- Optional: Markers or crayons for additional details
Step 1: Prepare Your Work Area
Before we begin, it’s important to create a comfortable work area. Lay down some newspapers or a tablecloth to protect the surface from paint spills or stains. This will make cleaning up much easier later on. Also, wear a craft apron or an old shirt to protect your clothes from any accidental splatters.
Step 2: Paint the Paper Plate
Let’s give our paper plate a tiger’s vibrant hue! Start by painting the entire front surface of the plate with an orange color. Use long brush strokes to ensure an even coat. Don’t forget to paint the outer rim of the plate as well. Set the plate aside to dry completely. If the paint appears streaky after drying, apply a second coat for a brighter finish.
Step 3: Make Tiger Stripes
Time to add some fierce stripes to our tiger! Once the orange paint is dry, dip a clean paintbrush into the black paint. Carefully paint thick, wavy stripes on the orange surface of the plate.
You can make as many stripes as you like, but make sure they are evenly spaced and cover a significant portion of the plate. Be patient and take your time to create neat and distinct stripes.
Step 4: Cut Out Tiger Facial Features
Let’s bring our tiger’s face to life! Take the black construction paper and cut out two rounded triangles for the tiger’s ears. Make sure they are big enough to be noticeable but not too large that they take up the entire plate.
From the white construction paper, cut out two smaller rounded triangles to fit inside the black ears. These will serve as the tiger’s inner ears.
Step 5: Glue the Ears
Now, let’s attach the ears to our paper plate tiger. Apply a small amount of craft glue to the back of each black ear cutout.
\Firmly press the glued section of each ear onto the top edge of the paper plate. Make sure the ears are positioned symmetrically and securely adhere to the plate. Hold them in place for a few seconds to ensure they stick properly.
Step 6: Add Eyes and Whiskers
Time to give our tiger its striking gaze! Apply craft glue to the back of two googly eyes and carefully position them on the plate, just below the ears. Press them down gently to secure them in place. For the whiskers, cut six thin strips from the black construction paper.
Glue three whisker strips on each side of the plate, slightly below the eyes. Make sure to space them out evenly.
Step 7: Complete the Facial Details
Let’s finish up our tiger’s facial details! Cut out a small black triangle from the construction paper for the tiger’s nose. Glue it onto the plate, slightly below and between the eyes.
If you want to add extra details, use markers or crayons to draw a mouth, nose dots, or any other facial features you desire. Be creative and make your tiger as expressive as you like!
Step 8: Optional: Add Personal Touches
Now that your tiger is complete, you can add some personal touches to make it uniquely yours! Use markers or crayons to draw patterns or designs on the tiger’s face or around the plate’s rim.
You can also experiment with different colors or add additional embellishments such as feathers or glitter. Let your imagination run wild and make your tiger truly one-of-a-kind!
Step 9: Display Your Fierce Creation
Congratulations, young artists! Your paper plate tiger is now ready to be displayed with pride. Find a special spot in your room or ask a grown-up to help you hang it on a wall. You can also attach a string or ribbon to the back of the plate and hang it from a hook or doorknob. Stand back and appreciate your ferocious work of art. Well done!
Whether you hang it on a wall or display it on a shelf, your paper plate tiger is sure to ignite your imagination and inspire your creativity. So, gather your materials, let your inner artist roar, and enjoy the process of creating your very own paper plate tiger.
Too Busy To Make A Paper Plate Tiger …
Try Cut and Glue Activity Book
Cut and Glue Activity Book is a perfect tool for your creative toddler! This workbook is designed to help children practice their scissor skills, develop hand-eye coordination, and fine motor skills. With 13 different projects of varying difficulty levels, your little one will have a blast cutting and pasting to create beautiful pictures. Not only is this a fun activity, but it also serves as an educational toy, helping your child learn shapes and colors.


