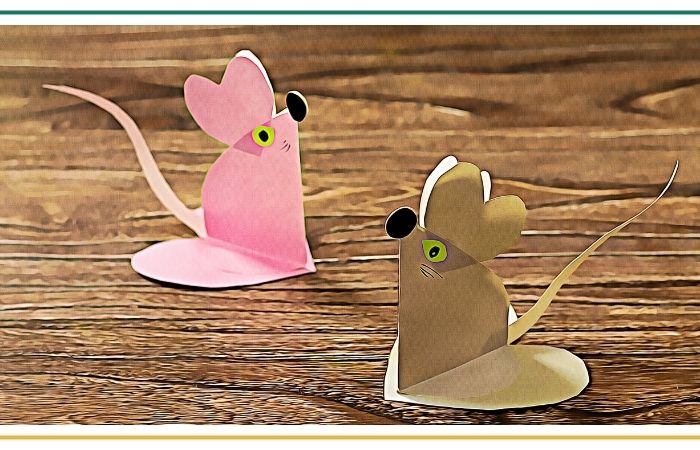
One rainy Saturday afternoon, my kids are feeling a bit restless. The television is turned off, the toys lie untouched, and I can sense their boredom growing by the minute. That’s when I bring out my secret weapon – the super-cute Paper Heart Mouse craft!
With just a few simple materials and a sprinkle of creativity, we transform ordinary paper into cute little critters. Not only do we have a blast creating these adorable mice, but it also allows us to spend quality time together.
Directions For Paper Heart Mouse
Today, we’re going to learn how to create a Paper Heart Mouse. With just a few simple steps, you’ll be able to make an adorable little mouse using colorful paper hearts. So, let’s gather our materials and get ready for some crafting fun!
So, grab your scissors, glue, and colored paper, and join us on our magical crafting adventure.
By the end, you’ll have a troop of precious paper heart mice to decorate your home and remind you of the joy of creating with your kids.
What You Will Need
Before we jump into the craft, let’s gather the materials needed to make our Paper Heart Mouse:
- Colored construction paper (choose colors for the body, ears, tail, and face)
- Scissors
- Craft glue or tape
- Markers or colored pencils for decorating
Step 1: Cut Out Four Hearts
To begin, let’s create the main elements of our Paper Heart Mouse – the hearts! Take the colored construction paper and use a pencil to draw heart shapes. You’ll need two small hearts for the ears, one big heart for the body, and one more heart for the face. Once you’ve drawn the hearts, carefully cut them out along the lines.
Step 2: Attach the Small Hearts to the Big Heart
Now it’s time to assemble the body of our Paper Heart Mouse. Take the two small hearts and attach them to the top of the big heart using craft glue or tape. Make sure the pointy ends of the small hearts are touching the rounded top of the big heart. These two small hearts will be the mouse’s ears.
Press down gently to ensure the hearts stick together securely. This will form the body of your Paper Heart Mouse.
Step 3: Glue the Body to the Last Heart
To create the complete shape of our Paper Heart Mouse, take the remaining heart and apply a small amount of craft glue or tape to the bottom of it.
Attach the body (big heart with the small hearts) onto the bottom of this heart, aligning them properly. This heart will serve as the mouse’s body, and the attached hearts will act as the ears.
Press down gently to make sure the body is firmly attached to the last heart. Give it a little wiggle to ensure everything is secure.
Step 4: Add the Tail
Next, we’ll add a tail to our Paper Heart Mouse. Cut a long, thin strip of colored construction paper for the tail. Then, apply some craft glue or tape to one end of the strip and attach it to the back of the mouse’s body. Let the other end of the strip hang freely, creating a curvy tail shape.
You can even curl the end of the tail by wrapping it around a pencil or pen for a cute touch. Press down gently to ensure the tail stays in place.
Step 5: Add the Face
Now it’s time to give our Paper Heart Mouse a face! Use markers or colored pencils to draw eyes, a nose, and a mouth on the big heart, just above the ears. Get creative and add some rosy cheeks or whiskers if you’d like. You can even use craft googly eyes for a playful effect.
Take your time and make the face as cute and expressive as you want it to be. This is where your mouse starts to come to life!
Step 6: Let it Dry
Congratulations on completing your Paper Heart Mouse! Now, all you need to do is let it dry. Place it on a flat surface or hold it upright for the glue to set and dry completely. This will ensure that all the parts of your mouse stay securely attached.
Once the glue is dry, your Paper Heart Mouse is ready to be displayed or gifted to someone special! Remember to personalize it and have fun decorating it with your own artistic touches.
![]()


