
Christmas is a time for family, friends, and fun. So it’s no surprise that kids love this season. With a little imagination, your preschooler can make a Mini Christmas Tree to carry around the holiday spirit.
Mini-Christmas trees are pretty easy to make and they can look simply adorable. These mini Christmas trees are the perfect addition to your holiday decorations. They’re fun, cute, and simple. And once you make them, they won’t cost a thing to display on your Christmas tree.
The best part? This is a perfect craft for keeping young ones busy while you get stuff done.
Fun Mini Christmas Tree To Make At Home
Miniature trees are great for both Christmas and mid-summer holidays. As a kid craft, you’ll be surprised at how quickly this project comes together.
Building a mini-Christmas tree is a fun way to add some holiday cheer to any room in your house. This ornament is an easy-to-make Christmas decoration that won’t blow your budget.
In this tutorial, we will be teaching you a quick but cute way of decorating your tree. The kids would also love working on this so it would be a good bonding activity between the two of you.
What You Will Need
- newspapers
- white glue
- acrylic paints (blue, red, and yellow)
- a piece of yellow pipe cleaner
- hot glue
- a pair of scissors
- red and green glitters
- ruler
- paintbrushes
I have included recommended supplies to help your crafting experience. Some of the links below are affiliate links. This means that, at zero cost to you, I will earn an affiliate commission if you click through the link to complete your supply list.
Directions For Mini Christmas Tree
Step 1: Prepare the materials needed

Step 2: Fold the newspaper

Fold half of the spreadsheet crosswise until you have a thin folded sheet of newspaper.
Step 3: Cut the folded sheet

The width of this should be at least 2 to 2.5 centimeters.
Step 4: Tightly roll the sheet

Make sure that there are no gaps or spaces starting from the middle all the way to the outer part of the roll.
Step 5: Hot glue the ends of the roll

You must have at least 13 rolls for this project.
Step 6: Paint the rolls accordingly

This will be the sequence of the rolls per color of paint: 1 green, 3 red, 4 blue and 5 yellow. Let the paint dry for an hour. You can also double coating if you are not yet satisfied with the end product.
Step 7: Apply white glue

Generously apply white glue on the tip or the side of the roll.
Step 8: Add glitter

Dip the glued side of the roll to a bottle of glitters. The green and the red ratio of the glittered side should be equal per colored roll.
Step 9: Let it dry

Let the glitters settle on the edge of the rolls for about an hour.
Step 10: Tightly wring a piece of a spreadsheet

This will be the base of the Christmas tree.
Step 11: Attach the newspaper to the base

Wrap the wrung paper on the bottle of the glitters or any object available that can accommodate the diameter of the Christmas tree’s base. Secure each layer of the turn with hot glue. This will make the base stiff. Does this until you reach the desired height of the base.
Step 12: Keep wrapping

Keep on wrapping the wrung paper until you reach the desired height of the base.
Step 13: Paint the tree base

Paint the Christmas tree’s base with brown paint.
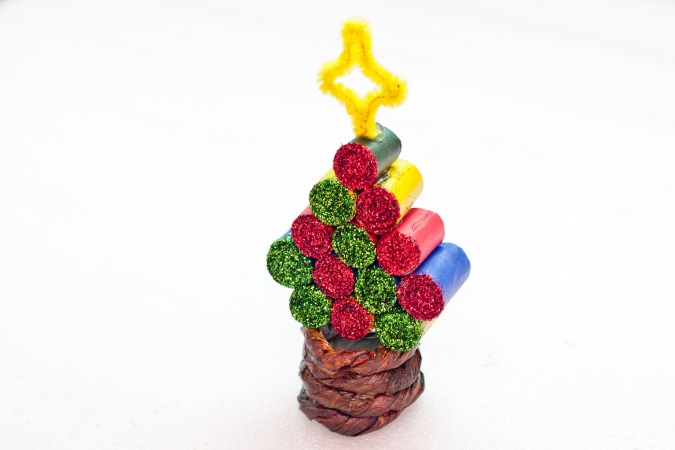
Step 14: Glue two yellow rolls together

Make sure that the glitter color of the two is contrasting. Glue the green roll on the space in between the two yellow rolls. The green roll will be the tip of the Christmas tree.
Step 15: Next glue the red layer
After the two yellow layers, glue the next red layer. Take note of the glitters. The colors of the glitters should be aligned in a diagonal fashion. Glue the widest base of the Christmas tree which is the blue. You should have a perfect triangle by now with an aligned color of the glitters.
Step 16: Glue the layers together

Glue the next and last layer just below the blue one, the yellow rolls. This will make the triangle look like a tree now.
Step 17: Add a star

Create a small star from the yellow pipe cleaner. Glue the star on top of the Christmas tree or the part where the green roll is located.
Step 18: Attach the base

Hot glue the base of the Christmas tree to the rolls.
Step 19: Tada! Finally done!

Your upcycled miniature tabletop Christmas tree is now ready for display!
Decorating need not be grandiose, you just need a straightforward décor that can remind you of the real holiday spirit.
This upcycled miniature Christmas tree is perfect for your office table, your study table or even on the side tables of your living room but also a good dashboard display in your own car. You can now decorate your place using this non-invasive Christmas tree.
Hope you liked it!
RELATED TOPIC
Smart Arts And Crafts For Kids: A Parent’s Guide To Creative Fun


