St Patrick’s Day is not just for the Irish. When your kids are feeling lucky, this Irish Utensil Holder is a fun and quick craft for any child.
The St. Patrick utensil holder is great for a special dinner with the family during the St. Patrick’s Day holiday. We came up with the idea of having a festive utensil holder to make your holiday meal extra special.
You can never go wrong with this utensil holder! Hope it helps you in preparing for the St. Patrick’s celebration!
Fun St Patrick’s Day Utensil Holder To Make At Home
This cute utensil holder is out-of-the-ordinary since your child can personalize it. You can custom the holder by either using markers or paints, depending on how much time you want to spend making it.
This holder can fit a fork, spoon, and knife and is easy to make, so you can spend more time enjoying the holiday!
The best part? It only takes 3 materials and 10 minutes of your time. So, what are you waiting for? Get in the spirit of St. Patrick’s Day with this adorable utensil holder!
What You Will Need
- green, yellow, and black crafting felt
- 2 pcs. medium-sized wooden button
- a piece of brown multilayered board
- blue and yellow or green acrylic paint
- a piece of a wooden skewer
- a hot glue
- a pair of scissors
Directions For Irish Utensil Holder
Step 1: Gather all the materials needed

Step 2: Corrugate the paper

Corrugate the brown, multilayered board using a wooden skewer.
Insert the wooden skewer into the side openings of the multilayered board and carefully lift the skewer upwards to remove the upper layer of the board.
Insert the wooden skewer in an alternating manner to properly remove the right layer.
Step 3: Fold the corrugated board in a half.

Make sure that you have the proper measurements for your utensils before proceeding to the next process. This assures proper fitting of the utensils to the utensil holder’s body.
Cut a curve on the sides of the folded corrugated board. Refer to the image to achieve the appropriate cut for this step.
Step 3: Mix the green paint

Mix a little bit of blue to the yellow acrylic paint to create a green color. Skip this part if you already have your own pre-mixed green acrylic paint.
Step 4: Paint the paper with green paint

Unfold the corrugated body and paint it with green acrylic paint. Let it dry for an hour before proceeding to the next process of this tutorial. This green corrugated body will serve as the body of the leprechaun.
Step 5: Cut the black felt

Cut a strip of black crafting felt that is at least 2 centimeters in width. This will serve as the belt of the leprechaun.
Step 6: Cut a rectangle from the yellow crafting felt

Make sure that the width of this is almost the same as the black belt. This will serve as the buckle of the belt. Create a hole in the middle of the rectangle that is synonymous with the outer shape of the buckle.
Step 7: Glue the buckle on

Hot glue the yellow buckle in the middle of the black belt.
Step 8: Attach the ends together

Meet the ends of the utensil holder’s body and generously glue it.
Step 9: Wrap the belt around

Wrap the belt around the corrugated body of the utensil holder
Take note that the position of the belt should be at least placed on the lower two-thirds of the overall body of this.
Step 10: Glue the yellow buttons

Place and glue the two yellow wooden buttons vertically, just above the buckle.
Step 11: Cut the shamrock

Cut a small three-leaf shamrock from the green crafting felt.
Step 12: Add the shamrock to the belt

Insert the small felt shamrock on the right (facing the object) part of the belt. Secure the stability of the shamrock by applying generous amounts of glue to the black of it.
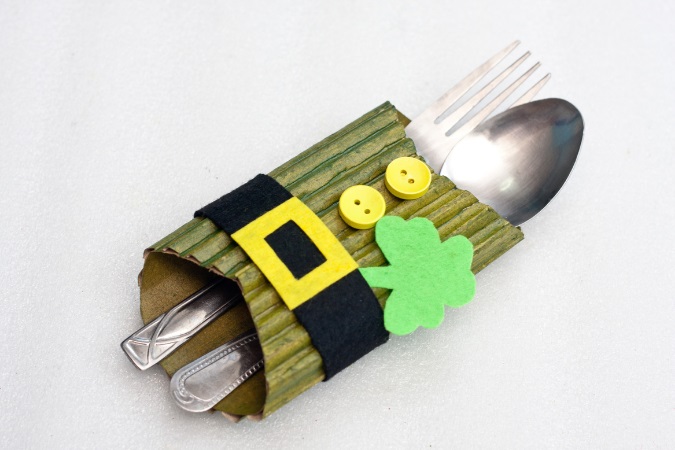
Step 13: Finally done and ready for use!

You can now impress your guest with your new festive St. Patrick utensil holder during your special dinner.
Though St. Patrick is the patron saint of Ireland, a lot of Irish nationals already migrated to some parts of the world. Parties and several festivities are happening on the 17th of March due to this anticipated holiday.
RELATED TOPIC
Smart Arts And Crafts For Kids: A Parent’s Guide To Creative Fun


