
Preschoolers can be so sweet and creative. And there is something so special about a Mother’s Day craft made by a preschooler. And this I Love Mom Cup is no exception!
It is a fun way to celebrate Mom or Grandma on her day, It’s super cute, easy to make, and best of all, your mom will love it!
It’s the perfect gift for moms who work outside the home—she’ll think of her kids every time she takes a drink from it!
Fun I Love Mom Cup To Make At Home
This adorable project is easy and inexpensive. It’s the perfect way to show your mom just how much she means to you.
All you need is some foam, paper straws, glue, and paint to make [your name] or [your handprint] on the front of a cup.
When that’s done, all you’ll have to do is fill it with candy, flowers, or something else special—and voilà! You’ll have a gift that any Mom will love to look at.
Are you ready to get started? Let’s go!
What You Will Need
- a small plastic cup (e.g. yogurt, etc)
- 2 pieces crafting rubber sponge (orange and blue)
- acrylic paints
- paint brush
- a piece of popsicle stick
- a piece of pompoms
- 2 small googly eyes
- masking tape
- a pair of scissors
- hot glue
I have included recommended supplies to help your crafting experience. Some of the links below are affiliate links. This means that, at zero cost to you, I will earn an affiliate commission if you click through the link to complete your supply list.
Directions For I Love Mom Character Cup
Step 1: Gather the materials needed

Step 2: Cut the top of the cup

Cut the hard lining in the mouth of the plastic cup using a pair of scissors. This cup will be the mini pot of this tutorial.
Step 3: Cover with masking tape

Wrap the masking tape around the middle body of the plastic cup.
Step 4: Paint the cup

Paint the cup using the red acrylic paint on the topmost part of it. The choice of color will depend on your liking. Let it dry for an hour and repaint it again to create the second coating.
Step 5: Remove masking tape

Once the paint has dried, remove the masking tape from the plastic cup.
Step 6: Paint the bottom with white

Paint the remaining bottom with a contrasting paint like white.
Step 7: Let it dry

Let it dry for an hour. You can double coat it if desired.
Step 8: Cut out the letters
Make letter cut-outs from the orange rubber sponge. You should have the letters I, O, two letter Ms and a heart symbol.
Step 9: Attach the message

Hot glue the letters to form an “I Heart MOM” message on the blue rubber sponge.
Step 10: Cut the edges of the letters

Make sure to put some allowances on the sides of letters to create a better look.
Step 11: Add the message

Hot glue the rubber sponge message on the plastic cup or the mini pot.
Step 12: Cut the popsicle stick in half

Step 13: Add pompom

Hot glue the pompom onto one side of the popsicle stick.
Step 14: Glue eyes on

Hot glue a pair of googly eyes to the pompoms to form a cute character.
Step 15: Add glue

Generously glue the opposite end of the popsicle stick.
Step 16: Add the popsicle stick

Stick the popsicle stick with pompoms on the inner bottom of the mini pot.
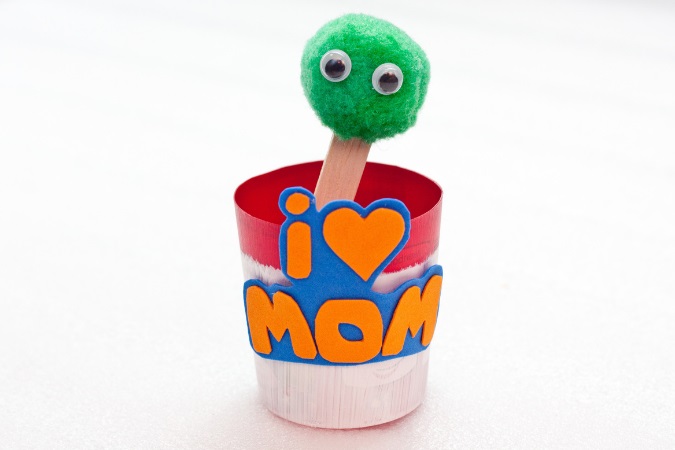
Step 17: Finally done!

You now have a charming I LOVE MOM character cup that is ready for display!
This I LOVE MOM character cup is a perfect gift for moms who love cute random characters. This character cup is easy to make and inexpensive as well. This will bring the child in you and at the same time, let your mom know how much you appreciate her.
RELATED TOPIC
Smart Arts And Crafts For Kids: A Parent’s Guide To Creative Fun


