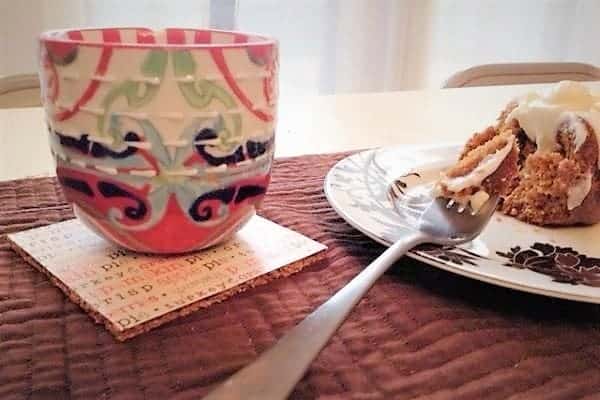
When I think of decorating my dining table for Thanksgiving or Christmas, I usually think about the plates, napkins, and table runners I will use. It’s easy to overlook one accessory that can immediately dress up your table—Thanksgiving Holiday Coaster.
Thanksgiving is a time of gathering with family and friends.
No matter what you decorate your dining table with, you can add a special touch by adding dining table coasters for guests to rest their drinks on.
Thanksgiving Holiday Coaster To Do At Home
Thanksgiving is the perfect time to decorate your table with coasters. A couple of quick and easy DIY projects will have you well on your way to hosting a holiday dinner for friends and family.
We have a couple of different sets of coasters in our house. One set is made from ceramic tiles. They were an impulse buy at our local dollar store and lasted quite a while. But now we wanted something special for Thanksgiving
The coasters from today’s DIY project are made of corkboard, which not only helps with condensation but also makes them toddler friendly.
What You Will Need
- Corkboard sheet tiles are 3.75-inch squares if that helps!
- Pen or fine point Sharpie
- X-ACTO knife (or scissors)
- Mod Podge (or other water-resistant sealers)
- Foam brush
- Holiday scrapbook paper
- Sample coaster for the template (optional)
Directions for Thanksgiving Holiday Coaster
Step 1: Trace (or measure) your coasters onto the corkboard with your Sharpie or pen. I created a set of 6, but if you’d like more or less, go wild.
Step 2: Now you’ll need to cut the corkboard. Since cork is naturally crumbly, it can be difficult to cut straight. I tried a couple of different methods—scissors, a razor blade, an X-ACTO knife, and a pizza cutter. I really thought I was on to something by thinking of the pizza cutter, but it didn’t cut it at all. Oh well. ‘A’ for effort.
The X-ACTO knife seemed to work best for me. Make sure to put something underneath your corkboard when using any cutting tool. Apply a decent amount of pressure when using the knife and it should cut pretty straight.
Step 3: Once you get all the pieces of cork cut, use them as templates for cutting your scrapbook paper. Then, use the Mod Podge to attach the paper to your cork. I always apply a thin layer of glue with a foam brush, so it doesn’t form little globs. Press the paper on the cork and smooth it down, so there aren’t any bubbles. I also placed a book on my coasters for a few minutes to make sure they dried flat.
Step 4: Some of the edges of the cork were peeking out underneath the top of the scrapbook paper, and it bugged me. So, I took the X-ACTO knife and scraped it along the edges to make them look a little cleaner. If you feel the obsessive need to do this as well, just know it can get a little messy.
Step 5: To make sure the condensation from your glasses doesn’t ruin your paper, Mod Podge the top of the scrapbook paper as well. This will form a seal and keep your paper safe from the water! I also sealed the edges of the coasters so they wouldn’t crumble anymore.
And voilà! Holiday coasters. Hope they make your table extra happy this holiday season!
RELATED TOPICS
Smart Arts And Crafts For Kids: A Parent’s Guide To Creative Fun


