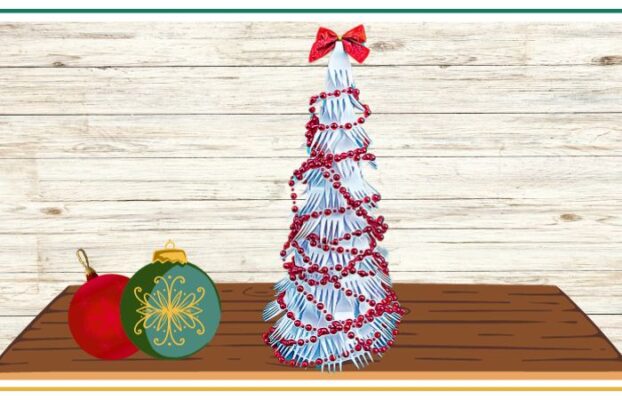
Are you excited to spread some holiday cheer? Today, we’re going to learn how to make a festive Holiday Fork Tree using plastic forks. This craft is not only a fun and creative way to celebrate the season, but it also provides a unique decoration for your home.
 So, let’s gather our materials and get ready to create a fork-tastic Christmas masterpiece!
What You Will Need
Before we jump into the craft, let’s gather all the supplies we’ll need to make our plastic fork tree:
- Plastic forks (green or any color you like)
- Styrofoam cone (medium-sized)
- Craft glue
- Decorative materials (such as pom-poms, sequins, beads, or small ornaments)
- Scissors
- Optional: Spray paint (if your forks are not green)
Step 1: Preparing the Forks
To start our project, we’ll prepare the plastic forks for our Christmas tree. If your forks are not green, and you want a green tree, you can spray paint them using a green color of your choice. Make sure to follow the instructions on the spray paint can and do this step in a well-ventilated area. Allow the forks to dry completely before continuing.
Step 2: Trimming the Forks
Next, we need to trim the handles of the plastic forks. Since we only want to use the fork parts for our tree, use scissors to cut off the handles close to the base of the fork. You don’t need to cut them perfectly, just make sure the remaining fork section is even and ready for the next step.
Step 3: Decorating the Forks
Now comes the fun part – decorating the forks! Get creative and add a touch of festive flair to each fork. You can glue small pom-poms, sequins, beads, or even tiny ornaments onto the tips of the forks to create delightful decorations. Feel free to use different colors and designs to make your tree truly unique and eye-catching.
Step 4: Starting at the Bottom
It’s time to assemble our plastic fork tree! Start at the bottom of the Styrofoam cone and apply a thin line of craft glue horizontally around the cone. Take one decorated fork and press it into the glue, with the forked part facing outwards.
Make sure the decoration is pointing upwards and slightly angled towards the cone’s center. Repeat this step, positioning each fork closely together, until you have completely covered the row at the bottom of the cone.
Step 5: Building Upwards
Now, we’ll continue building our Christmas tree row by row. Apply a line of glue just above the first row, a little higher up the cone. Attach the decorated forks in the same manner, with the decorations pointing upwards and slightly angled towards the center.
Make sure the forks in the new row overlap the bottom row slightly to create a layered effect. Repeat this process, one row at a time, until you’ve covered the entire cone with the decorated forks.
Step 6: Finishing Touches
Once you’ve covered the entire cone with your festive forks, it’s time to add some finishing touches. You can glue additional decorative materials onto the forks, such as pom-poms, sequins, or small ornaments, to make your tree even more dazzling. Let your creativity shine, and feel free to personalize your Holiday Fork Tree in any way you like!
Step 7: Displaying Your Fork-tastic Tree
Congratulations, creative decorators! Your plastic fork Christmas tree is now complete and ready to be displayed. Find a special place in your home for your tree – it could be on a tabletop, mantle, or any other spot that needs a bit of holiday magic. Don’t forget to show it off to your family and friends, who will surely be impressed by your crafty skills!
Step 8: Optional: Lighting Up Your Tree
If you want to add an extra touch of sparkle to your plastic fork tree, consider adding some twinkling lights. You can string battery-operated fairy lights around the tree, tucking them in between the decorated forks to create a magical glow. Just be sure to use lights that are safe for crafts and don’t produce heat.


