 Does your daughter want to make a cool purse with style .. Like Mom ? If that is a yes, then this Floral Sponge Purse is for her. And the best part … it won’t cost you an arm or a leg.
If you have a creative child, she will love this Floral Sponge purse as a craft project. It is a bright, colorful one that your little girl will adore.
It combines her love of flowers with her artistic expression.
Fun Floral Sponge Purse
Today I am going to show you how to make a purse. You can make this cool floral wallet
You should let your daughter have her own choices in selecting colors. With the right tools, material, and design, she can craft her own personalized purse in an afternoon.
This activity is very kid-friendly so anybody can do this in the comfort of their own home. And it is a great way to spend some one-on-one time together. Your little one might be surprised how fun the activity is and she is going to be proud of the results. So, let’s start!
What You Will Need
- 4 colors of sponge paper
- Concrete glue
- Craft scissors
- Scissors
I have included recommended supplies to help your crafting experience. Some of the links below are affiliate links. This means that, at zero cost to you, I will earn an affiliate commission if you click through the link to complete your supply list.
Directions For Floral Sponge Purse
Step 1: Prepare all the materials

Step 2: Cut a rectangle from orange felt

Cut a rectangle of at least 8 centimeters in width. The length would depend on how big or deep you want your purse to be.
Step 3: Fold your rectangular sponge into three parts

One side is the flip of the purse, so make it a little bit thinner.
Step 4: Punch holes on the side

Using the craft scissor, punch some holes on the sides of the folded rectangle, except the part that serves as the flip of the purse. Do this on both sides.
Step 5: Cut two very thin strips of blue felt

This will be used to sew the sides of the purse.
Step 6: Sew edges with thin blue sponge

Make an overcast stitch on the sides of the purse using the thin blue sponge. Make sure to tie a knot before you start stitching. Do this on both sides.
Step 7: Finish the edge with a knot
Tie a knot at the end of the overcast stitch to seal the side of the purse.

Step 8: Cut a design with the edge
Create some curvy designs on the flip of the purse using the craft scissors.

Step 9: Pinch two holes in the middle part of the purse flap

This will be used to create a tie lock later.
Step 10: Cut another thin piece of blue sponge

This should be as thin as the one used on the sides of the purse. Slide it on the holes made from step 8 and secure it by making several knots on top and at the bottom part of both sides.
Step 11: Add two holes to the front

Pinch two holes on the mid-part of the front body of the purse. Make sure to align the flip cover first before attempting to pinch it. This will be used to place a lock on the purse.
Step 12: Sew a strip of blue sponge in front

Cut another thin blue sponge strip and slip it through the hole made in step 11. Tie the knot from the inner part of the purse. Make sure that this is tight enough so that the purse won’t open easily.
Step 13: Add decor to the front

Start designing the purse by cutting a cute flower décor from a piece of pink sponge paper.
Step 14: Glue the pink flower décor on the darker purple sponge

Then cut this but leave a small border to create a shadow effect on this part of the décor.
Step 15: Glue flowers to the front

Make at least two flower designs and glue them to the purse using concrete glue on the flap of the purse.
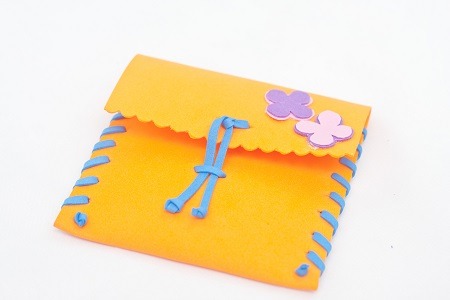
Step 16: Done! You can now use your funky sponge paper purse

You can put some coins in the purse but make sure that you won’t put a lot inside since this purse is not made for heavy-duty use.
You can experiment with colors and designs. You can also change the size if you want a bigger version of this.
Just make sure that you have considerable spacing when pinching holes in the overcast stitch since this will assure the durability of the purse. Hope you like it!


