
Flowers are the perfect gift for Mother’s Day, but sometimes they cost a fortune. These Crepe Paper Flowers are just as sweet and won’t break the bank.
Your kids can make a bouquet of crepe paper flowers and give it to Grandma in a special way she’ll love! It’s easy and fun! You’ll need some crepe paper, scissors, and a glue stick.
It’s a great way to show Grandma how much she means to you, and it’ll only cost you $2. That’s right: your love doesn’t have to break the bank. Follow our super-easy tutorial and you’ll have an adorable little bouquet in no time.
Paper Crepe Flowers To Make At Home
When it is Mother’s Day, you can buy flowers from the store, but they’ll be gone before you know it.
Instead, I’m going to teach you how to make a beautiful bouquet of flowers using crepe paper! I’ll walk you through it step by step. And your kids can turn a plain piece of crepe paper into a beautiful rose, in honor of your favorite person on Earth: Mom.
You can also buy the crepe paper or tissue paper from an old gift bag. But it’s more fun to use floral gift wrap that you already have in your home.
What You Will Need
- a piece of green and red crepe paper
- a piece of pink Japanese paper
- 3 brown pipe cleaners
- 3 rubber bands
- plastic sheet
- hot glue
- white glue
- purple satin ribbon
- a small piece of paper
- black pen
Directions For Crepe Paper Flowers
Step 1: Gather the material.

Step 2: Fold the pipe cleaners into two equal parts. Twist the folded pipe cleaners.

Step 3: Cut the red crepe paper. The width of this should be at least 8 centimeters. Unfold the crepe paper and divide this into three equal parts. You should have three strips of red crepe paper by now.

Step 4: Fold the red strip lengthwise. This will serve as the flower’s petals.

Step 5: Sandwich one end of the pipe cleaner to the folded red strip.

Step 6: Start wrapping the crepe paper around the end of the pipe cleaner. Continue doing this until you reach the end of the red strip.

Step 7: Tie the base of the petal using a rubber band.

Step 8: Fix the spacing of the wrapped red crepe paper to make the flower more realistic.

Step 9: Do the same for the next two flowers. When you are done, it should look like this.

Step 10: Cut a strip from the green crepe paper. This should be at least 4 centimeters wide. Cut several triangular spaces on one side of it. This will serve as the sepal of the flower and this will be wrapped immediately at the bottom of the red petal.

Step 11: Wrap the green crepe paper on the immediate bottom of the flower. Make sure that the pointed end is oriented on the topmost part. Use white glue for permanently sticking this.

Step 12: Do the same procedure for the remaining two flowers.

Step 13: Cut three medium rectangle-shaped pieces from the pink Japanese paper.

Step 14: Cut a medium rectangle-shaped piece from the plastic sheet.

Step 15: Hot glue the two flowers permanently. Make sure that one flower is taller than the other.

Step 16: Glue the third flower, but this time, make sure the position is lower than the second one.

Step 17: Arrange the sheets accordingly based on the following order starting from the bottom: plastic sheet and three Japanese papers arranged in random positions. The orientation of the plastic sheet and the Japanese paper should be in a diamond position.

Step 18: Fold the right sheet towards the center of the flower.

Step 19: Fold the right sheet again towards the right side, thereby opening a window to the flower’s body.

Step 20: Do the same on the left side of the sheet. Hold the sheets on the center when you have achieved the proper folding of it.

Step 21: Hold the sheets tightly together with the flowers and fix the unnecessary folds on the top and on the sides of the bouquet.

Step 22: Wrap the purple ribbon around the sheets and the flower and tie a bow from it.

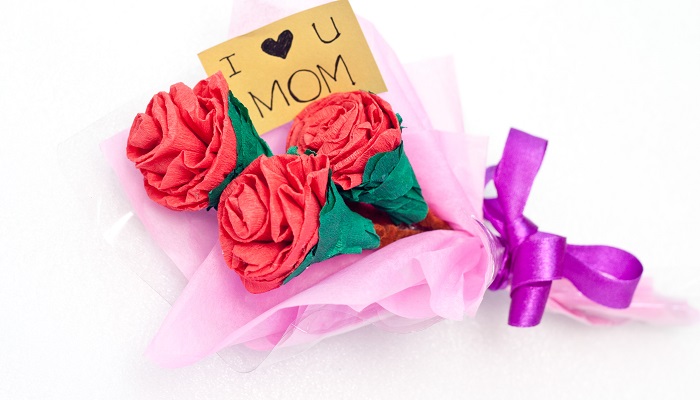
Step 23: Write your special message for your mom on a piece of paper.

Step 24: To finalize the look, insert your small message on the side of the flower bouquet.

Now you don’t need to rush to buy flowers in the store. This will save you all the hassle and your mom will definitely appreciate this since you made it on your own. What are you waiting for? Make your mom feel special this Mother’s Day by making this bouquet! Hope you like it!
RELATED TOPIC
Smart Arts And Crafts For Kids: A Parent’s Guide To Creative Fun


